Painting continues along with the first big do over I've had in a while.
The upper and lower guides for the door have been done for a while and sitting on the bench. I kept thinking I really need to get those installed, but I was really unsatisfied with the quality of the finish work so I finally took the sander to them. With 200 grit they were sanded smooth with all the high spots taken down. If going to bare wood was what it took, then that's what happened. They were sanded smooth to the touch and then the first of three or four coats of white paint was put on. After those, the other two loose pieces also got another coat.
The conduit between the battery bays was installed. After painting the grey from yesterday white, the PVC was cut to length, slid into the hole and a union glued to each end.

Those two holes you see are for mounting the engine.
The fuel filter was secured by tightening the two bolts that hold it down, the two fuel lines, 3/8" from the tanks and 5/16" to the engine were attached, and the three power wires and the 5/16" fuel line were run through the conduit. Plenty of room!


The power cables were connected to the batteries and the big fuses installed.


A deep breath and the main switch was turned on.
No bangs, pops, snaps or the smell of burning was a real good sign! I turned around to discover that every light in the cabin was on! Into the cabin and the lights were turned off, then the switch was thrown for the side navigation lights. And they came on! Yay!
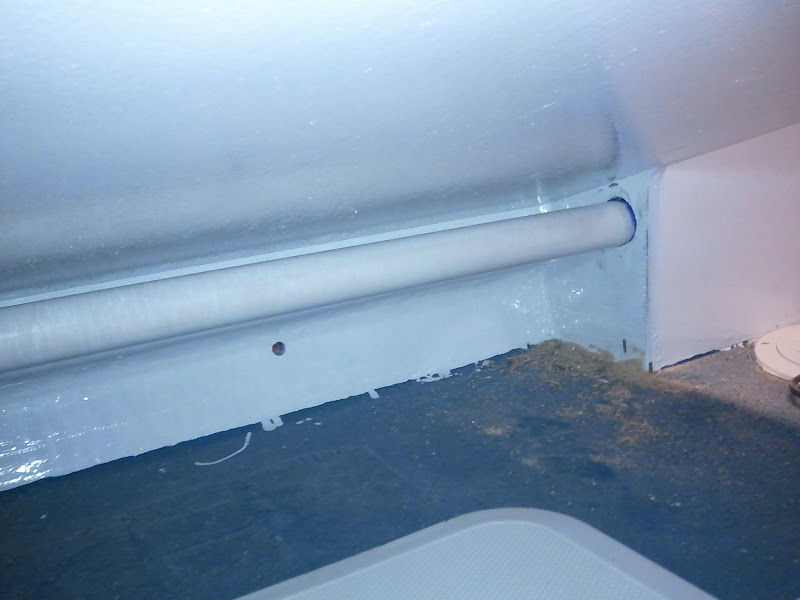
From there it was time to finish cleaning up the wiring in the cabin. Originally the wiring was being held in place with a zip tie mount screwed to the ceiling. That left the wire suspended away from the ceiling and I really didn't like the look so I switch to a round mount.

This looks and works much better. It puts the wire right up against the roof and in the corner.
After fixing the cables inside the cabin, the stern light was done. The cable was cut to length, the sheathing slit back, the wires connected with a butt splice, and the sheathing wrapped around everything, zip-tied in place and mounted to the roof.

Doesn't look great, but until I come up with something better, it'll have to do.
Back up to the roof I went for a measurement. I've spent a lot of time thinking about whether to purchase a GPS antennae or not. There's one built into the chartplotter, but since it doesn't have a full view of the sky it probably won't work worth beans in a place like Tracy Arm (which is a narrow fjord with 3000' cliffs on either side). So I bit the bullet today and bought one. Since it will mount on the roof and the roof isn't flat, I needed to figure out where to mount it and what the angle of the roof is at that point. I decided to put it starboard side outboard of the grab rail and the angle at that point is about eight degrees.
Off to the table saw. Set the blade angle at eight degrees and raise it all the way up. Run a piece of clear Douglas fir through, finish the cut with a hand saw and even that out with the sander. I decided to make the mount round and slightly large that then puck shaped antennae so I started the cut with a hole saw, then drilled the hole for the cable to go through and finished cutting the piece out with the hole saw.

Back onto the roof to place and level my piece of wood, and to continue drilling the hole through the roof.

While I was up there I painted the inside of the holes for the antennae and the anchor light and wired the anchor light. Then went down to the cuddy and put female spade connectors on and attached them to power.

The power was turned back on and the stern light and anchor light successfully tested. Just for grins I turned on the chartplotter and it too works!
The bezel was installed on the gauge; I selected black as I've got enough white in the cabin and I didn't like the look of chrome.
The nut was installed and tightened on the steering wheel.
And I scraped the paint off the inside of the front windows. Not nearly as painful as I expected. I'll get the outside tomorrow.


After pulling the screws in the transom well for the splash protectors and the sonar transducer a batch of epoxy was made and using a syringe the epoxy was squirted into each of the holes. Then the wood fitting for the GPS antennae was liberally coated with epoxy.
At this point is was time to do some cleaning. All the trash was hauled out of the boat, all the wiring stuff went in one box, manuals collected in a single place, empty boxes pitched out of the boat and stuff consolidated. Grabbed the shop vac and went to town in the cuddy and cabin cleaning up all the dirt and sawdust.
Now I've been thinking for a couple days that I really didn't like what was happening on the floor of the cabin. The white paint was taking a beating and really showing that it wasn't an appropriate color for the floor. So I've decided to paint it gray. It'll match the transom well and kind of continue that color through the boat, plus I'll add some non-skid (purchased this time) to make it safer to walk on.

I think it looks pretty good.
Last before heading home was another coat of white on the door supports and the loose pieces. I'm really glad I decided to redo the supports, they look a hundred times better and that makes me happy.
8.75 Hours