Monday, October 31, 2011

Day 51 - No tricks

Just treats.

Back working on the boat after four days out of town. Took me a few tries to get back in the swing of things. Kept having to go back and forth to get all the right stuff I needed from different areas of the shed.

First I finished screwing the middle jig and horse down, then the rear jig. I wasn't able to do this the other night as I'd broken my two phillips head bits, but a side trip to Home Depot in Anchorage (while there over the weekend) to buy a five pack got me back on track.

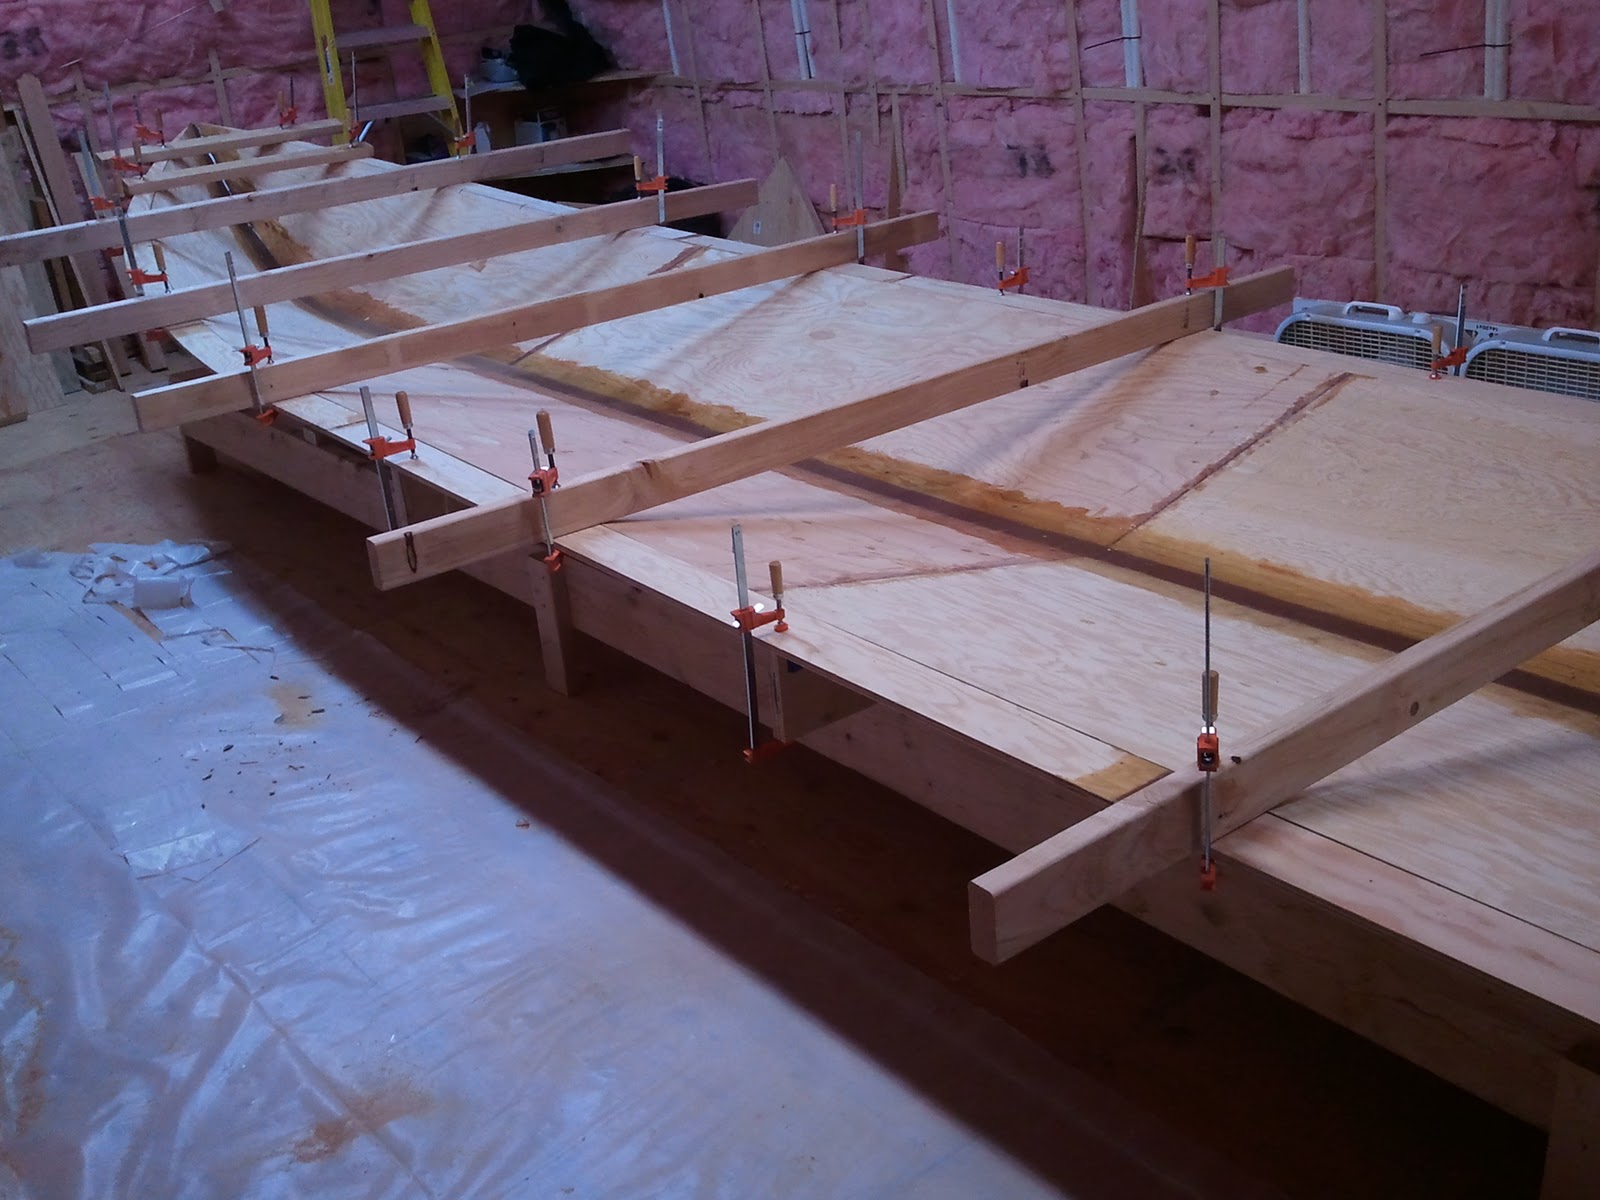
Next I grabbed the shelves and changed the angles on the scarfs from 1:1 to 5:1. That increased angle isn't the 8:1 that a really good scarf should be, but it will work just fine for these. I set the right hand shelf on the jig and clamped it to the front and middle jigs and I did the same for the left hand shelf. The front jig uses extensions to drop the clamp point down below the horizontal plane of the main jig and the combination of the two clamps started the bending of the shelves to achieve the upward sweep of the bow. When I checked to see how close the tips of the shelves at the bow were I was pleasantly surprised to find them only about 3/4 of an inch apart. I screwed two blocks to the tips and used a clamp to pull them together.

I grabbed the bowstem (used to tie the tips of the shelves and the tip of the hull together and to provide a place for the sides to connect to when they meet at the bow) and the four framing pieces (two on each side at the rear to provide support and rigidity for the sides between the shelves and the hull) and routed the corners off and then sanded them relatively smooth.

Next up was cutting the end of the 10' long 4x4 that holds the bowstem in place (kinda in midair, you'll see it in the picture), at the right angle (55 degrees) and aligns it with the jig. I attached a piece of 1x4 to the 4x4 and then attached the bowstem to the 1x4. I put the 4x4 on the jig, aligned the tip of the bowstem with the tips of the shelves and TaDa! everything lined up! Yay!


To tie all the pieces together at the bow will require epoxy and a few screws to hold things in place while the epoxy sets. I'll screw the 4x4 to the front and middle jig pieces when I'm ready to lock it in place. There is definitely going to be some work to be done on the bowstem to make everything fit well, but again I'm getting to the point where more custom work will need to be done.

Speaking of which... I worked some on the shelves and corner braces at the rear of the boat. These shelves and corner braces tie the sides to the transom and provide a lot of strength. I grabbed a piece of left over 1 1/8" plywood and started figuring and cutting. Got the first two pieces cut out and went to test fit them and wouldn't you know it, DDD! I'd grabbed a piece of 3/4" ply instead of 1 1/8"! Oh well, templates!

Time to quit, so swept up a good sized pile of sawdust, put the tools away and called it a night.

3.5 Hours

Wednesday, October 26, 2011

Day 49 & 50 - Cheating just a little...

Yesterday just one thing got accomplished. Gary, Daniel and Wes came over and we propped the hull up against the wall.


Today a lot more got done. I spent the evening building jig framing pieces. These framing pieces will to used to hold all the boat pieces together (stringers, transom, shelves, bowstem and hull) so that the sides can be attached. Once that happens I'll have something that'll at least float!

There are four framing jig pieces and a "horse" that is used to prop up the ends of the stringers near the front of the boat. The others ends of the stringers will sit in slots in the transom and will be cut flush just before everything is epoxied together. I didn't quite finish attaching all the framing pieces to the jig as I somehow managed to break the tip off two separate phillips bits. Go figure.


I'm out of town for the next four days so nothing will happen until Monday when I'll finish mounting the framing and then start hanging things off it.

3.5 Hours

Monday, October 24, 2011

Day 48 - Gettin' better

Today was simple. Dig the wire stitches out of the cured epoxy on the keel, snip them off and drive the extra below the surface of the plywood. Take the orbital sander with 60 grit sandpaper and sand down the cured epoxy that had run through the gap in the keel (but had been stopped by the blue tape) to bare wood. Pour epoxy in the gaps in the keel where the epoxy from the inside hadn't run to. Put down three layers of 10 oz glass; four inches, six inches and eight inches wide; the length of the keel, but stopping short of the 1/2" to 1/4" scarf.


I'm getting good at this. There were almost no wet looking spots (indicating to much epoxy), just weave showing in the final layer. I used what resin was left to fill holes and smooth out the scarf in the back end of the boat.

Then I cut the stitches around the chine flats at the front of the keel. I'll drive those flush, and do the stitches in the keel in the 1/4" plywood when I have more support in place. The bow section of the keel is just hanging there so it's pretty wobbly (technical term ;-).

Tomorrow we'll set this up out of the way so I can start on the jig for holding the transom, stringers, shelves, bowstem and keel in place (in that order).

3 Hours

Sunday, October 23, 2011

Day 47 - Extra bodies...

are a good thing too!

Today was a slow day, but another big one. There was nothing to be done working on the hull as I was waiting for the epoxy to cure so the hull could be flipped tonight.

In reality, there are lots of things to do, like building more jig pieces and getting ready for the next steps, but all of those would have involved getting stuff out and moving stuff around and in general making a mess that we would have had to work around to flip the hull. So I spent part of the day doing errands and part of the day thinking through the next steps and starting to plan for the turning of the boat. There are a lot of things to do before then, but...

Anyways, I called some friends and convinced them to come over to help and while I was expecting three, I got five! Gary brought his son Daniel and friend Jon, and Wes and Jerry came over. After talking about the boat for a few minutes, we spent a minute talking through the flipping process and another minute doing it an voila'! it was done!


I peeled the blue tape off the bottom seams and did some scraping on the edges of the chines where the epoxy had dripped. Tomorrow I'll need to take the grinder to the areas where epoxy that ran through the keel has really set up. Then I'll glass and epoxy the bottom of the keel with three layers of 10oz glass.

2 Hours

Saturday, October 22, 2011

Day 46 - Extra hands are...

a good thing!

This morning I started out by taking the braces and clamps off and sweeping out the hull. Did some serious cleaning, sweeping and threw away all the cups and mixers I'd been using with the System 3 epoxy as I've basically run out. I'll use what's left for little projects, but as today was to be a big glassing day it was time to switch to the Aeromarine Epoxy I'd ordered. Flipped the board for the mixing area and cleaned the rest of the tools.

Then I grabbed the orbital sander, put on some 60 grit paper and went over the entire hull. I went through six disks before I finished as the epoxy was still a little soft, but I wanted to smooth everything down, getting rid of the random bumps and drips of epoxy as this fiberglass was to be the last layer on the inside of the bottom. Swept and vacuumed the hull again.

Laid down some fresh poly and started cutting sections of the 38" wide 10 oz fiberglass. These sections go from chine to chine across the keel and overlap each other about one inch.

Then... It was go time! Start this fiberglassing project and there's no stopping until you're done! And you've got to hustle as you've got about 25-30 minutes before the epoxy sets off, so...

Are you ready for this?

Roll a section of fiberglass on my PVC pipe. Mix a 15 oz batch of resin. Pour it in the hull on one side. Spread it on one side all the way to the edge of the chine and overlapping the section lines and working down towards the keel. Move around to the other side, pull the epoxy up from the keel, again spreading from section line to section line and all the way to the edge of the chine. Take a chip brush and sweep side-to-side smoothing out and evening the epoxy. Move back to the other side and repeat. Grab the rolled up fiberglass and carefully leaving about an inch hanging off the chine, roll it down the hull keeping it lined up with that section line, hustle around to the other side and roll it up and over the edge. Back to the first side, grab the roller and gently but firmly roll from the keel towards the chine pushing the fiberglass into the resin while smoothing out any small folds and forcing the bubbles out, and then around to do the other side. Then it's time to make more epoxy and using a brush fill in the dry spots and make sure the glass is flat.

Whew!

Repeat!

Midway through putting in the sections of glass one of my friends came by to help. I promptly put her to work right in the middle of everything. She did a great job!


When we got up towards the bow and the second to the last section things started getting harder. I had started at the stern as I knew that would be the easy area and a good place to learn, but now... These last two sections at the bow are compound curves (bending in two dimensions) and the second to the last section required getting my hands right down in the epoxy. We got the epoxy on the ply and the glass rolled across and then while she worked the glass with the roller I used my fingers and palms to work the glass pushing and pulling to get it flat and without any folds or voids.

Then it was the last section. We got the ply coated and then together we lowered the glass into the hull. The curves here are just way too extreme to have any hope of keeping the glass flat without slashing it (cutting it in the middle of a fold and overlapping the pieces) a few times. This time she had her hands in the epoxy and again did a great job working everything down smooth. I took the last of our batch of epoxy and with the brush hit the dry areas and she worked the epoxy and glass getting rid of the voids and smoothing everything until it was close to perfect as it could be.

Everything needed a couple hours to set, so she went home and I went and ran some errands then came back and mixed up more epoxy then filled the weave and called it a night.

Tomorrow night I'll flip the hull assuming I can find some suck... uh, friends :-) to come help. There's no way I'm gonna try this on my own!

8 Hours

Friday, October 21, 2011

Day 45 - Big day after big day

It seems that every day now is a big one with lots of progress. Tonight I worked on and finished fiberglassing the chines to the inside of the hull. You'll remember from yesterday that I had a bunch of 2x4s and even more clamps holding the chine flats in place while the epoxy in the seam cured. I wasn't sure that the epoxy would hold or would be enough to keep the chine flats level, but I decided to slowly take the clamps off one at a time and see what happened.

After successfully removing all the bracing everything held together. The chine flats near the front had "sagged" downward, but that wasn't a surprise as they were sagged even further when I first stitched them on. But it wasn't enough to stop me from applying the fiberglass and that's what I did.

A good soaking of epoxy on the hull and chines where the glass would go, then two layers of 10 oz fiberglass (10 oz refers to its weight, but I tend to think of it as its thickness, 10 oz glass is 2.5X thicker than 4 oz glass and correspondingly takes more epoxy to soak it), four inches wide and six inches wide was laid down next, and then a whole lot more epoxy was added to soak everything out.

When I did the seam at the keel I laid down three layers of 7 oz glass instead of the two layers of 10 oz. I have more 7 oz glass than I need, but after almost running out of 4 oz glass I decided to use the 7 oz and save the 10 oz just in case.

Now I'm glad I did that because getting these two layers of 10 oz soaked was a lot of work!

After getting the glass on, smoothed and the bubbles out I put three cross braces and clamps back on to pull the chines up while the epoxy cures tonight.


Tomorrow I'll glass the inside of the hull and then Sunday night I'll flip it if I can find enough help. It will probably be a four person job to do it safely.

Oh, by the way, I've basically finished the five gallons of resin I started with, so with the two and a half gallons of hardener that's seven and a half gallons of epoxy mixed and used already!

4 Hours

Day 44 - All together now...

Where does every guy love to spend time?

At the hardware store.

What can you never have enough of if you're a woodworker?

Clamps.

Guess what I needed more of and where I went to get them. :-) Yep, another Home Depot run after I foolishly thought I'd never need more than nine clamps. Uh huh, right.

Anyways, the goal for today was to get the chines connected to the hull. Renn suggests using a slot cutting bit in a router to cut slots in the hull and the chines, then cutting strips of wood to fit in those slots and then gluing the whole mess (literally) together with epoxy. I don't have and couldn't buy the bit and couldn't buy the strips of wood so after asking the folks on the support board what they did, came up with my own solution.

I decided to stitch and glue my chines to the hull.

I stacked the chines on top of each other and measuring straight from the tip, at one foot intervals back to where they straighten out I drilled holes 1/2" from the edge. Next I did the same on the hull, hooked the tape on the point of the bow and measured straight back, marked and drilled holes.

I then laid the left chine in the hull and starting at the tip, stitched the chine to the hull snug, but not tight. Leaving the chine in the hull gave it support while each additional stitch moved it out towards the edge and eventually onto the hull mold support. Repeated this with the right chine.


Clamping was next. I clamped the left side chine to a 2x4 where the straight transitions to the curve, then went around to the other side, pushed and pulled things tight and clamped it down. Repeated this process at every other stitch headed up towards the bow which slowly leveled out the chines, then worked my way back down tightening up the stitches which really pulled everything together. On the straight part of the chines I clamped the chines to the hull molds and then to 2x4s spaced in between.


This was as far as I was going to go, but it was only eight o'clock so I made some thickened wet epoxy and filled the gap between the chine and the hull. I have no illusions that this will do anything for strength, it's simply to keep the epoxy for the glass from running out the bottom creating voids and bubbles.

I'll put down the fiberglass strips tomorrow, removing one clamp at a time to get the glass underneath and then reclamp to maintain the integrity. Saturday I'll glass the bottom and if the schedule holds I'll probably flip the bottom Sunday night.


4.5 Hours

Wednesday, October 19, 2011

Day 43 - And the chines continue...

Well, at the end of tonight I'm where I could have been yesterday. Oh well.

Got to the shed tonight and it was a little cool. This chasing the temperature around needs to stop and will probably require getting a different heater. I'm getting tired of having to worry about it and deal with it.

Anyways, pulled the screws from the scarfs, trimmed the edges and did a little scraping. It's interesting that even in these cooler temperatures that the epoxy is almost fully set up in 24 hours versus the 72 hours it was taking before. Suspect number one is the iceberg that had formed in the resin. Clearly the chemical properties of the resin has changed, but fortunately I'm at a point where having it set up in 24 hours is actually a good thing and lets me move along more quickly.

Took the large piece of scarfed plywood and propped it on the hull and traced the shape, measured the offset, put in the nails, stretched the batten and drew the line.


Looks familiar doesn't it?

Cut out the first one with the jigsaw, traced it again and cut the second one, cut scarfs on the ends and went to do a test fit. It'll work, but there's going to be a lot of pulling, prodding, pushing, stitching and clamping to get everything tight.

Put the straight pieces from yesterday on the floor and screwed them down, mixed up some epoxy and glued up the scarfs to the curved pieces.


Good work finished tonight. Tomorrow will be challenging, but I can see that this might get flipped this weekend.

3 Hours

Tuesday, October 18, 2011

Day 42 - The shortest day

Urgh. Had to work late tonight to get a customer back online so I didn't get to the shed until after 8. I pulled the screws from the new scarfs, scraped the joints and added a piece of glass and some epoxy on each to strengthen them.

No pictures, not much change!

1 Hour

Monday, October 17, 2011

Day 41 - Scarfs, scarfs everywhere...

Just when you think you're done with scarfs more pop up.

Today was a good example. I started working on the chines (the flat narrow areas of the hull parallel to the water) which are made up of several strips of 1/2" ply scarfed together. Did some measuring, did some more, grabbed some 1/2" ply scrap and started cutting. These are small scarfs so I decided to try and do them with the hand planer. After a couple false starts, and starting over, I finally started to get the hang of it and got all of them done. Makes a heck of a lot of sawdust and wood pieces from cutting across the grain.

And again it was epoxy time. I made a mistake last night and left the heat on too high and when I got in tonight it was over 70. Not good as the combination of the large quantity of epoxy in one area and the higher temps meant the surface was pretty hard and tough to scrape from yesterdays keel joint work. So tonight I brought the temperature down to 60 by turning the heater off when I got in and then tried to adjust it to hold there.

I flipped the shelves over and set them on the floor, put some epoxy around the joint and put down pieces of glass. I decided to fill the weave of the glass in the keel joint so that I don't have to sand to make the epoxy layers stick so I did that. Next I laid out the pieces for the chines on both the floor and the sawhorses, coated the surfaces with epoxy, made some some peanut butter with the leftover and screwed the scarfs together. Used what was left to fill some tiny gaps in the scarfs of the hull ply and ended up with just a little extra. I'm getting better at judging how much epoxy to make!


4.5 Hours

Day 40 - One loooong joint

Today was a big day with a single focus; completing the fairbody (keel) joint.

First thing was to try and deal with the angle at the bow and the measured distance at the control point. After pushing and prodding, blocks and spacers, and several additional wires used to try to stitch that gap from yesterday, no luck. Drastic measures were called for.


Two blocks and a spacer was what it took to spread the panels, achieve the angle and almost match the distance at the control point (1/2" too wide right now). This will be an absolute pain to deal with for a while since I'll have to work and fiberglass around this contraption.

Even with the extra wire used to try and close the gap I was still not successful so I went to stage two: blue painters tape. I started out just putting the tape under the keel along the gaps, but decided to do the entire keel.


Then it was on to preparation of the fiberglass. Multiple strip 4", 6" and 8" wide.


Multiple sets of parallel lines to the keel were drawn to assist in alignment of the fiberglass and then the epoxy work began. A quick painting of resin in the keel area to wet the plywood and then multiple batches of peanut butter were made, poured in the keel and spread evenly. The area around the bow was tricky as the epoxy needed to be very thick so that it didn't run back down. Then the layers of fiberglass were laid in; 4", 6" then 8" on top.


This massive amount of fiberglass and resin (plus its' duplicate on the bottom when the hull is flipped and the fiberglass layer on the top and the bottom) provides the necessary strength to hold the keel together. As you can see from the above picture, the fiberglass is still white necessitating a large additional quantity of resin be added, carefully spread to keep all the layers in place, bubbles worked to the surface, and up near the bow, the fiberglass cut to allow for the bend in the hull creating folds in the fiberglass. All the while the clock is ticking as the chemical reaction in the epoxy starts and I could actually feel the heat from the epoxy as I was working the glass. But finally it was done!


It's a far cry from perfect, but it'll do fine. I think it will take a couple days to cure, which is good as I have the chines to work on for the next couple days and then I'll fiberglass the inside of the bottom.

I put some fiberglass on one side of each of the shelves at the scarf (it needed to be done days ago, but I couldn't get to them for lack of space) and that finished it up for the day. I've run out of working space so I did a little preparation for the next few days that included another run to Home Depot and then I quit for the night. Early too! 5pm.

7.5 Hours

Saturday, October 15, 2011

Day 39 - A little sweat equity

goes a long way. My other best friend came over today to lend a hand and the timing was spot on.

I'd gotten the day started by pulling the screws and washers from the hull panel scarfs and then pondered trying to get them up on the sawhorse by myself. With five sawhorses I figured I could get one end up off the floor and on the middle sawhorse and then pivot it up and into place. Grabbed a 2x4 and clamped it across the scarf for support and up it went! No sweat. Then I did the same with the other one, stacking them so the 1/4" panels were next to each other. Grabbed the book and started laying out lines.


After finishing cutting the panels and then tracing the cuts onto the other 1/4" ply that will be added later I drilled the stitching holes then started assembling and squaring up the jig. My friend showed up and we really got things moving. I set her up assembling the hull framing molds while I cut 2x4s for the legs and the rear extension on the jig. When she finished we installed the legs while leveling the jig and screwed down the molds. Last we moved the hull panels onto the jig and then she had to go. Don't know if I could've gotten those panels in place on my own.


Hey! Maybe this will be a boat after all! I was going till wait for tomorrow to start stitching the panels together (using wire run through holes near the edge of the plywood with the ends twisted together to pull the panels together and hold them in place) as bending the 1/4" plywood up towards the bow is normally a two person job. But with some creative use of some scrap wood to prop the plywood up, successively tightening the wire as I worked towards the tip of the panels and a little muscle things came together!


Starting to look like something other than a pile of wood!


You can see where the wire's been twisted and how it bent the 1/4" ply up and together. That gap near the bottom will need to be pulled together with some more wire tomorrow.


There are two crucial measurement to be done at this stage. One is at the control point I've set up in the picture above. At 40" back from the tip of the hull the width should be measured at 42". I'm at 40" right now but I'll have to check a more critical measurement tomorrow and that's checking the angle of the bow. It must be 55 degrees in reference to the floor, otherwise everything else will be off.

Finally I did some serious cleanup and constructed a screening tray made of 1x3s and some screen mesh and filtered out my sawdust pile putting the fine stuff in a bag and the rest in the trash. The filtered sawdust will be used for making peanut butter for the multiple fillets I'll be doing from here on out, starting tomorrow with a huge one down the centerline of the hull.

Tomorrow I'll set the control angle and measurement and then I'll start glassing!

11.5 Hours

Day 38.1 - Update

A brief update for tonight. As you'll recall I brought the resin home to put in hot water to decrystallize. I'm doing this by putting the five gallon plastic cube container in an ice chest and adding hot water (about 160 degrees) After about an hour I finally got the nozzle off the top and surprise! There's what looks like an iceberg inside! I had been wondering why the level of fluid in the resin container was going down faster proportionally than the hardener container; now I know why. That huge crystal inside was throwing things off. As a consequence of this I didn't go over to the shed until later tonight.

I'm glad I did as the peanut butter in the scarf that had squeezed out was just hard enough to cleanly separate from the plywood, but pliable enough to stay together and come off as once piece.

When I got home I found the crystallized resin had all reverted back to a liquid, but I drained most of the water and added more hot. The rule of thumb is once you get back to liquid you need to keep it at at least 120 degrees for a couple hours to get rid of the micro-crystals that you can't see but that will restart the crystallization process again.

Friday, October 14, 2011

Day 38 - Somedays...

are just meant to be short. Had the day off today with two goals: finish the transom and get the hull plywood ready to go.

The transom was in really good shape from last night; after cutting the green glass and pulling up the blue tape there was very little scraping to do. You can see in the next photo the overlap of the two fiberglass pieces used last night.


I shuffled the side panels off to the side wall to continue curing and to free up the floor space. Next I moved the transom off the end wall and over to the side wall and added another layer of 4oz glass all the way across the transom Versalam. Can you see it in the picture below?


The glass was cut to flow over the corner and down across the fillet. This is one of the high stress areas of the boat and while Renn doesn't call for it, this added strength makes me more comfortable.

The last pieces of the boat to work on before assembly starts are the bottom hull panels. The 1/2" plywood pieces were scarfed together days ago and have been in the way ever since, but I'm finally finishing them. The first thing to do was to cut the scarfed panels to length. Renns' original design was for a 22' boat which means cutting three feet off these panels, but since I'm adding two feet to mine I only cut off one foot. I laid the panels side by side on the floor using one of the seams to help line them up and put some screws in to hold them in place. Next were the 1/4" panels, they were very carefully lined up and screwed to the floor at the far end from the joint. A batch of resin was mixed and and the wood in the joints liberally applied, then the extra resin was mixed with microballoons and Cab-o-sil and put in the scarf and everything screwed down with extra screws and washers.


Off to Home Depot as I'm running out of gloves (the moment I get a hole in a glove it's thrown away and a new one put on), plus I needed tie wire, a new fluorescent bulb and some screening so I can screen my pile of sawdust into something usable.

Last I headed home as I need to soak my resin container in some hot water for about three hours as what's left in the container has crystallized. Hot water reliquifies the resin. Over time it will crystallize again, but I'll be using a bunch in the next few days so I should be ok.

I'll be heading back over the the shed tonight to take the resin back and pull up the blue tape and do a little scraping. The scarf between the 1/2" ply and the 1/4" ply is obviously uneven and clearing out the resin tonight will be much easier than tomorrow.

Tomorrow the hull panels will be cut to shape and the jig built. I won't start actually assembling the the hull until Sunday to give todays scarf time to really set up. Until fiberglass is applied that joint is pretty weak.

10 Hours

Day 37 - And the resin flows

Tonight was quietly successful. My goal was to finish the last panel and get glass on the transom.

It was a little cooler tonight, 58 degrees, so I turned the heater up a little and started by trimming the glass on the edge of the panel that got its first coat last night. Fiberglass with resin that hasn't fully cured is referred to as "green" and as long as it's still flexible and green it cuts relatively easy. Like the past couple nights I took a razor, ran it down the edge of the panels and trimmed the excess glass right off.

I read a trick somewhere about creating smooth lines in the resin/fiberglass by laying down blue painters tape along your line and fiberglassing right on the tape. While the resin is still green you can run a blade along the line and pull the tape and glass right up. I put down the tape along the section of the transom that will get glassed later and started cleaning up the transom. I spent almost an hour smoothing out the inside of the transom and scraping excess peanut butter in the original fillets. They're pretty rough when made with the coarse sawdust so I mixed a batch of resin, microballoons (just what they sound like, microscopic spheres of hollow resin balls) and Cab-o-sil (really fine powder). The combination works just like peanut butter but is much smoother and the microballoons add bulk without weight. I made a lager round ended tool by cutting a plastic putty knife to shape and troweled the new peanut butter in over the old fillet to fill it in and smooth it out.

That new fillet needed some time to set up so I mixed a batch of plain resin and spread it over the panel I finished last night. Easy peasy, but used enough time to let the fillet set up.

Back to the transom I put resin on the wood and let it soak for a few minutes and then carefully laid the two pieces of glass I had cut earlier and rolled them into the fillets and the resin. I used two pieces because trying to handle one piece 4' by 8' and work it over the fillets would have been a nightmare to manage. I also overlapped the glass in the middle of the transom adding strength in a high stress area. Here's what it looks like.


The pink is the color of the resin when the microballoons are added and you can see the blue tape under the glass.

Long night, but I knew it would be...

4.5 Hours

Thursday, October 13, 2011

Day 36 - Another DDD

DDD = Ding, Dang, durn it. It seems I'm using it a lot right now so I'm going to use DDD instead.

Got to the shed tonight after some dilly-dallying and a brief nap and found the temperature at 70! The difference between 60 and 70 on the heater is really small, I'm going to need to mark it when I find the sweet spot.

Anyways, the panel I faired last night was mostly cured so I shuffled side panels again so I could continue fairing the two I worked on last night, plus the last one. Grabbed the roll of fiberglass and rolled it out and...


Well, DDD! Five inches too short! Arggh!

Oh well, grab a chunk of the scrap I've been cutting off the edge (as the fiberglass is 38" wide and the side panels are 32" wide), cut it to length and we'll use that.

I changed my resin technique slightly and put on only enough to soak into the plywood, then rolled on the fiberglass (including the short piece) and then added more resin to the dry spots. You can tell when you've got just enough resin; the fiberglass disappears leaving only the pattern of the weave. If there's not enough resin, or the ply soaked more in, then you can see white or whitish areas of fiberglass. This way of doing it takes more time, but I think will ultimately produce a lighter product as there's less resin being used.


In this picture you can see what it ideally should look like in the middle, while out around the edges there's still too much resin. I also figured out a better way to deal with the bubbles that are still appearing. If I take a chip brush (a really cheap brush) and lightly drag it across the bubbles, they pop and I can also slightly spread out the excess resin without dragging the fiberglass cloth.

So, one panel is completed, two have been faired and are curing, one will be faired tomorrow and I think I'll glass the inside of the transom tomorrow as well. That'll be a challenge with all the changes in planes from the 1/2" doubler at the bottom, up to the 1 3/4" Versalam and back down to the 3/4" doubler at the top.

3.5 Hours

Wednesday, October 12, 2011

Day 35 - Quiet time

Tonight was a quiet night full of work and learning. When I got in I discovered that the first panel was covered with tiny bubbles and the fiberglass had slightly "floated". The floating is not a problem, although I don't want it to happen again and I know that it happened because I used to much resin. As to the bubbles, I was somewhat mystified as typically you get bubbles when the temperature is rising while the resin is curing causing entrapped air in the wood to come out, but the temperature in the shed is fairly constant and definitely on the cooler side at 60 degrees.

The solution? Scrape the bubbles down level with the rest of the surface and apply another coating of resin to fair everything out. After scraping the panels I also scraped the stringers and the shelf and set them to the side.

Next I set up the sawhorses to allow me to get the first panel up off the floor and set up for two more panels. I then had to shuffle the 1/2" ply for the hull bottom around (again) to get to the other side panels. Once that was done I set two of the three side panels up on the sawhorses and started mixing resin.

First I mixed up a batch for the original panel and leveled it out. Then I started the second panel. Two batches of resin got the plywood coated, a third gave me something to set the cloth in. After rolling out the cloth I used the roller to smooth it out and push the fiberglass down into the resin. A fourth batch of resin was used to fill in the dry spots and lo and behold guess what started to show up? Yep, those bubbles. It appears that pushing the fiberglass down into the resin pushes the air back up and the resin is too thick to allow the bubbles to pop. A quick swipe over the top with a small squeegee popped the bubbles.

Last I started work on the third panel. I repeated basically the same steps as on the second panel with the same bubbles problem, but I used less resin, so less bubbles. I think the trick is using less resin than I've been trying to use and only adding it as needed after the fiberglass is on. I'm getting better at this so we'll see how the fourth panel goes.

I'm also going to have to go back to the book for some research. I'm glassing the inside of the side panels right now. I may take a hard look at glassing the outside of the panels while on the flat versus once they're actually built in place. Glassing on an angle is no fun!


One full shed!


Oops! Almost blocked myself in!

4.5 Hours

Monday, October 10, 2011

Day 34 - Tiny bubbles...

My legs are killing me tonight. Spent way to much time on my knees and up and down. Anyways...

As usual started out with scraping. Scraped the transom and the shelf, then picked the transom up (man it's heavy!) and took it over to lean it up against the wall. And then I noticed the gap. What the?!?!?! There's a gap between the 1/2" ply and the Versalam on the top edge! How did that happen? There was squeeze out! Somehow a 1/16" gap opened up along the top edge but not along the ends. Hmmm...

Well, there's a fix for that, it's called epoxy. So I mixed up a little batch, added some acetone to thin it a bit and then put some blue painters tape on the back of the gap to catch any runoff. Then I started pouring epoxy into the gap. And pouring, and pouring and pouring... And pretty soon the first batch was gone! Little bubbles kept popping up as the epoxy ran down in.

 
So I made a second.

And then a third. And it finally topped out. I have no idea where it went, but I poured almost 18 ounces in, and none came out any of the holes or along the ends or bottom, so it's a big mystery. The only thing I can figure is that the inside of the Versalam must have been slightly cupped, but I'm not really sure, but I'm glad I caught it before it was to late.

The little bit of left over resin was used to coat the knots on the other side of the stringers and the back of one of the shelves.

It turned out to be a nice day so I took all the wood scrap down to the beach and burned them in the firepit for a break and then it was back at it. Swept the floor and laid down the first side panel. Unwrapped the fiberglass cloth and realized I had nothing to cut it with! Ding, dang, durn it! Went to Joanns and bought a rotary cutter and a pair of metal scissors, then back to the shop.

Cut the first piece of 4 oz cloth and rolled it up on my PVC rollers, made up a large batch of epoxy, poured it out and started spreading. Made some more and made sure the ply didn't have any dry spots, then rolled the cloth on. Used the serrated metal roller to press the cloth into the resin and made another batch of epoxy to help fill the weave. It will be interesting to see how things look tomorrow as the cloth looked like it was trying to float in the resin so I may have either used too much or I may need to change my process and wait to fill the weave until the resin that the cloth is sitting in has a chance to set.


Called it a night as I'd really run out of working space. Lots of pieces all over with resin in various stages of curing. All fiberglass work will be done up on sawhorses from here on...

Tired and sore tonight.

7 hours

Sunday, October 9, 2011

Day 33 - Righting the wrong

Another good day. Started off scraping all those things I put epoxy on yesterday; the shelves, stringers and transom. Then I got to work re-cutting the slot in the transom for the shelves and corner brace. I set the saw for 15 degrees and carefully set the depth. I then made three cuts, one on one side of the slot and two on the other. I needed two to get the bottom of the cut out from under the top of the cut so I could go to work with the router. I very carefully set the depth on the routers and using the long straightedge securely clamped to the sawhorses made four passes to clear out the channel in the transom.


As you can see, I got a little lucky and managed to exactly hit the seam line where I had epoxied in the old piece I had cut out of the doubler. This time the angle is right!

Next I grabbed the planer and cleaned up the left and right edges, trimming off the little bit of the Versalam sticking out and bringing all the layers to a smooth surface. Flipped the transom over (that thing is heavy!) and sanded it smooth, then set it aside.

Now it was time to work on cutting the shelves. I had left these for last as the scarf was only cut on a 45 degree angle and the epoxy had had only about 16 hours to set up which meant it was still relatively weak. I very carefully lifted the first one up on the sawhorses and cut both edges, one with the Skilsaw, the other with the jigsaw. I flipped it over (much easier without all that scrap wood), scraped the joint and then screwed a scrap piece of ply across the joint to provide some support. Then I did the other one, same process.


Last, I mixed up a batch of epoxy and painted the exposed knots on the one shelf still up on the sawhorses and started filling the screw holes in the transom (now on the floor) and painting the corners where the Versalam meets the plywood in preparation for a fillet (a concave joint made with peanut butter to strengthen the connection and provide a curved surface for the fiberglass to transition over from the vertical to the horizontal). While messing around, all of a sudden the epoxy started getting really warm! Crikey! It's cooking off! (When the chemical reaction in the epoxy really gets going it starts heating up and shortly thereafter it sets up. This happens much more quickly when in a cup versus being spread out.) I frantically started mixing in sawdust and spreading the peanut butter for the fillets. I just managed to use it all as right near the end it was getting really sticky!

That finished things for the evening as I really need to clear the floor space for fiberglassing the inside of the side panels and the inside of the transom. Plus I need to cut the 1/2" ply for the bottom of the hull to length and epoxy on the 1/4" ply.

8 Hours

Day 32 - Ain't they purdy?

Today was awesome and I busted my butt. Ran a bunch of errands and got started working about 10 am. First thing was to do good cleanup, sorting stuff, getting things reorganized and a good sweeping. Then I got to work on finishing laying out the shelves. Had done the right one yesterday, did the left one this morning and set them aside.

Just as I finished the new Versalams showed up. The driver and I hauled them into the shed and I quickly unwrapped them and broke the bands. Grabbed the small one and sure enough; straight, flat and square. Took the rest of the wrapping off the big one and started pulling staples. The joker that wrapped these must get paid by the staple, I must have pulled a hundred of them. I very carefully went over it three times looking for more staples or stubs, don't want to hit them with the Skilsaw or the planer!

Put the long one up on the sawhorses and sure enough; it too was straight, flat and square. Good for Valley Lumber, hopefully they'll get it sorted with their vendor. Set that sucker on the floor and went to work on the small Versalam.


I was going to saw it to width, but changed my mind and grabbed the planer. What a tool! Ran it down one edge of the Versalam to get rid of the glue...


and then planed down the other edge for a real nice tight fit into the slot in the transom. Drew the cut lines and set it aside.

Next I put the long Versalam back up on the sawhorses. Glad I've got five of them, at 19' I needed all of them. :-) Very carefully set the angle on the Skilsaw and made a couple shallow cuts on one end to get the spacing exactly right to split that really expensive piece of wood in half. After cutting it, I carried one piece outside to turn it around lengthwise and when I set it side-by-side with the other one they're within a 64th of an inch of each other. Yay!

Now came the hard thing for the day, cutting (with the Skilsaw) the multiple angles necessary to shape the Versalam to match the curve of the hull. You start at 12 degrees and work your way through 14, 16, 19, 21, 24, 29 and 37 degrees out at the tip. I intentionally cut wide of the line and then using the planer set to its shallowest depth, 1/64", and eased up to it. There's an art to this boat building thing and while shaping the stringer I really started to get comfortable with the free-handing necessary to blend all those angles together.

Don't they look nice?


Next I cut the angles on the small Versalam and then cut the ends of the shelves at an angle for a scarf.

Made lots of sawdust doing all this cutting, and figured I was done cutting for the day, so cleaned everything off and swept the floor real well, carefully putting wood, sawhorses and tools out of the way for the epoxy work to come.

I set up the epoxy station and then laid the shelves out on the floor again carefully measuring everything again. I wanted to get the front two pieces on each side scarfed together so when I cut them width wise everything will line up well. I had to do a little trimming with the planer to get the first two pieces to line up correctly on the scarf, but had no problems with the other two. Some strategic screws and I was off to the transom. I found a really flat spot on the floor and laid the transom down and got the Versalam ready for epoxy. Finally, I set the stringers out so I could epoxy all the knots (they soak up lots of epoxy and they're a weak spot in the board, so adding epoxy now seals them and strengthens them).

Mixed up a batch of epoxy and liberally coated the slot in the transom and then made another batch and coated the Versalam and decided to leave them open and let the epoxy soak in. Then I went and applied lots of epoxy to the scarfs on the shelves, propping them apart for now. Went back to the transom and added a little more epoxy, flipped the Versalam into place and screwed it down. Took a chip brush and liberally coated all the knots on one face of the stringers and all the knots on the faces of the shelves. Then took the last of the epoxy, made some peanut butter and liberally coated the scarfs for the shelves and screwed them down tight. Took the last of the peanut butter and pushed it into the couple of small gaps in the transom.


Called it a night at 10 pm and considered it a successful day!

12 Hours

Friday, October 7, 2011

Day 31 - Made money today

by returning the ten extra rolls of fiberglass to Home Depot! Didn't do much, but wanted to get that out of the way so I wasn't constantly dancing around it tomorrow. I also got rid of some of the scrap wood that I wasn't going to use, mostly the original shelves, by piling on to a neighbors slash burning pile.


That plywood had been in the shop for almost three weeks and was really dry so it burned really well!

Tomorrow I'm back at it!

1 Hour

Thursday, October 6, 2011

Day 30 - No more PINK!

Well, actually there's lots of pink, but I won't have to handle it anymore. I finished taking down the last of the plastic and finished the other side and end walls. I need just a *little* more, but I'm not going to break open a 25' roll just for four feet. Somehow I managed to buy way to much fiberglass and thinking about it on the way home it dawned on me that I failed to allow for splitting the batts in half. Duh.

Got the other two PVC ribs in and they have mostly, if not fully, pushed the ceiling back up into place. I've essentially doubled four of the nine ribs, so if I need more I can double the other five.

Photos from opposite corners.


Did a bunch of clean up and organization and am looking forward to getting back to boat building tomorrow. Yay! Shelves to finish laying out, cutting, scarfing and glue up. I also need to cut to length the bottom pieces of 1/2" ply and glue on the 1/4". I'm really tempted to extend the boat another six inches since I'll be cutting off almost a foot from the stringers, but I'll have to think hard about that...

Also heard from Walt at Valley Lumber that my new Versalams are in. I went by to talk with him tonight about delivery and they'll be brought over Saturday. He said he looked at the long one and it looks good, didn't open the short one though. They've also got them in the warehouse so they're not sitting out in the rain which I appreciate.

3 Hours

Wednesday, October 5, 2011

Day 29 - Almost done with PINK

Made some decent progress tonight although I'm not finished with the insulation. I changed my mind from last night and focused on fiberglass tonight.

I was pleased to walk in tonight and find the temperature at 60 degrees and the heater off! Yay! That immediately improved my mood. I moved the long pieces of plywood off the long wall and completely finished it. I then worked on and finished the end wall that had no insulation last night. Also did some cleanup and put some thought into the long-term storage of the extra pieces of wood I'm going to hang on to for use later.

Tomorrow I'll finish the fiberglass, get rid of the multiple trash bags full of the packaging from the fiberglass, get the last two PVC supports up and sort through the piles of scrap wood to figure out what to keep vs. burn. Looks like I may even be returning some fiberglass to Home Depot. That'll be a change. ;-)

I'm looking forward to getting back to boat building. This has been a bit of a drag. Taught me I don't want to be a insulation installer guy though, think I'll stay with being a telephone guy. :-)


3.5 Hours

P.S. As a geek of almost 30 years and having started using Macs with the Mac 128, my condolences to Steve Jobs' family. He was an amazing man who has touched us all with his genius.

Tuesday, October 4, 2011

Day 28 - PINK redux

Well, here's the photo that should have been taken last night.


And here's the one from tonight.


Got last of the twine across the ceiling, then did the battens on one end wall and stuffed it with fiberglass. Got battens partially up on the other and didn't buy enough (grrr...) and got some bits and pieces of fiberglass in various places. Also spent about an hour and a half fighting and dinking around with trying to get the new PVC supports in. I originally tried to fit one in parallel to an existing one (on top of the horizontals, but after fighting that for almost an hour gave up and finally ran them under the horizontals. I've got two in place and it has definitely helped, we'll see how it looks after the other two are in place.

This process has felt really disorganized. I don't multi-task well and I think tomorrow I'm going to focus on getting the other PVC supports up, then finish the insulation on one side wall, then each end wall one at a time and then the other side wall. Felt a little discouraged with the apparent lack of progress.

3.5 Hours

Monday, October 3, 2011

Day 27 - MORE PINK!

Further progress was made tonight on the fiberglass work. I've finished one outside stub wall, the lower end walls and all the twine for the hanging batts except the highest one. I'm pleased with the progress and I think two more days will do it. Even though the temperature had dropped to 38 degrees by the time I left tonight the temperature inside was a pleasant 62 degrees.

I am going to have to add some more internal PVC ribs for support. There's noticeable sag in the roof right now and that's not going to work when it starts to snow.

Good news! I got a call today letting me know that my fiberglass order is in! That's exciting because I was almost to the point of having to wait for that before I could do anything else. I'm also expecting the new Versalams later this week.

No pictures tonight, the phone battery went dead listening to music. :-) I'll take a make-up one tomorrow before I start.

4.5 Hours

Sunday, October 2, 2011

Day 26 - PINK!

Last night was our first night below freezing and while it wasn't that much of a surprise I was disappointed to find the temperature inside of the shed had dropped to 43 degrees. That has precipitated semi-drastic measures. I've pulled all the plastic down and have started putting in a layer of fiberglass insulation. I bought R-30 rolls and separated the layers in half and started threading them up through the PVC structure.


This was the "easy" part. Next I used heavy duty twine to draw up the batts to the sides.


As you can see it looks pretty good! I've got quite a ways go till it's finished, but it's getting there. A couple three more days I would guess. I may have to add more PVC ribs. This has added a lot of weight to the structure and I won't see the results until tomorrow when I've got daylight.

8 Hours